The rock cycle – a continuous process by which rocks are created, changed from one form to another, destroyed, and then formed again. A process taught in all Earth Science curricula, usually in the middle school or early high school years. And earth science is a fun science that can be super interactive!
The Rock Cycle
“Solid as a rock.”
Have you heard that expression?
Rocks have a reputation for being solid, hard, and indestructible. But rocks are always changing! Existing rocks undergo change as outlined in the rock cycle (which is similar to the water cycle).
The difference is that, unlike the water cycle, you can’t see the rock cycle steps happening on a day-to-day basis. Rocks change very slowly under normal activity, but sometimes catastrophic events like a volcanic eruption or a flood can speed up the process. Rocks line river beds and jut above the landscape as mountain peaks; they are fun to collect and sometimes are very beautiful.
Each rock is different; some are smooth and round, some are sharp and dangerous. They come in all colors: pink, green, orange, white, red. And yet, scientists classify them all in only three groups! Keep reading to learn about the three types of rocks and the rock cycle.
Three Types of Rocks in the Rock Cycle
Igneous rocks are formed when hot magma cools rapidly, either by hitting underground air pockets (intrusive igneous rocks) or by flowing from the mouth of a volcano as lava on top of the ground (extrusive igneous rocks). Granite, obsidian, basalt, and pumice are all common examples of igneous rocks. Pumice is a very porous rock because when the lava cooled, pockets of air were trapped inside. Because of all those air pockets, pumice can actually float!
Sedimentary rocks are formed by layers of sediment (dirt, rock particles, etc.) being mixed and compressed together for extended periods of time. Common examples of these rocks are limestone, sandstone, and shale. Sedimentary rocks often have lots of fossils in them because plants and animals get buried in the layers of sediment and turn into stone. Clastic sedimentary rocks are rocks that people generally think of; rocks that have pieces of other, pre-existing rocks that form a new rock.
Metamorphic rocks are a combination of rock types, compressed together by high pressure and high temperatures. They usually have a more hard, grainy texture than the other two types. Schist, slate, and gneiss (pronounced like ‘nice’) are metamorphic rocks.
The Six Rock Cycle Steps
1. Weathering & Erosion. Igneous, sedimentary, and metamorphic rocks on the surface of the earth are constantly being broken down by wind and water. Wind carrying sand wears particles off the rock like sandpaper. Rushing river water, crashing surf, and precipitation all rub off the rough edges of rocks, leaving smooth rocks or pebbles behind. Water seeps into the cracks in mountain rocks, then freezes, causing the rocks to break open.
The result of all this? Large rocks are worn down to small particles.
When the particles are broken off a rock and stay in the same area, it is called weathering.
When the particles are carried somewhere else, it is called erosion.
2. Transportation. Eroded rock particles are carried away by wind or by rain, streams, rivers, and oceans.
3. Deposition. As rivers get deeper or flow into the ocean, their current slows down, and the rock particles (mixed with soil) sink and become a layer of sediment. Often the sediment builds up faster than it can be washed away, creating little islands and forcing the river to break up into many channels in a delta.
4. Compaction & Cementation. As the layers of sediment stack up (above water or below), the weight and pressure compacts the bottom layers.
(Try making a stack of catalogs and watch how the bottom one gets squished as you add more on top – this is the same idea as the compaction of layers of sediment.)
Dissolved minerals fill in the small gaps between particles and then solidify, acting as cement. After years of compaction and cementation, the sediment turns into sedimentary rock.
5. Metamorphism. Over very long periods of geologic time, sedimentary or igneous rocks end up buried deep underground, usually because of the movement of plate tectonics. While underground, these rocks are exposed to high heat and pressure, which changes them into metamorphic rock. This tends to happen where tectonic plates come together: the pressure of the plates squish the rock that is heated from hot magma below.
(Tectonic plates are large sections of the earth’s crust that move separately from each other. Their movement often results in earthquakes.)
6. Rock Melting. Can you imagine ‘rock hard’ rocks melting? That’s what they do in the depths of the earth! Metamorphic rocks underground melt to become magma. When a volcano erupts, magma flows out of it. (When magma is on the earth’s surface, it is called lava.) As the lava cools it hardens and becomes igneous rock. As soon as the new igneous rock is formed, the processes of weathering and erosion begin, starting the whole cycle over again!
See if you can find sedimentary, igneous, and metamorphic rocks where you live. As you study them, think about how they have undergone many slow changes to become what they are.
Draw a picture of the rocks you find and then draw a diagram of the rock cycle steps. Keep reading to see how you can experience the rock cycle process for yourself!
Gemstones
Wind and water and blowing sand can, over time, rub away the rough edges of rocks, leaving smooth stones. In nature, this is called ‘weathering.’
But weathering can happen at home, too! Many people use a rock tumbler to shape and polish the rocks they collect. (You can get a bag of rocks to tumble here, too, if you don’t have your own!)
A rock tumbler mixes the stones with several types of grit to rub away the roughness, just like rocks ‘tumbled’ with sand in an ocean or river.
The results are smooth, shiny rocks. When people tumble gemstones (usually semi-precious ones they find), they can end up with beautiful colors and can even use polished stones to make their own jewelry.
A gem or a gemstone is any mineral that can be cut and polished for jewelry or other decoration. The most precious gems are chosen for their beauty, rarity, and durability. Semi-precious gems usually have one or two of these characteristics but fall short in some other areas.
Fluorite, for instance, is very beautiful but it is too soft and will scratch easily. Agate, quartz, and amethyst are other examples of semi-precious gems.
Diamonds are gemstones that are considered very precious and for good reason. Though they are made of carbon, one of the most common elements, diamonds are generally regarded as some of the most beautiful gemstones.
They are relatively rare because most diamonds are not jewelry quality. Diamond mines usually have 1 part diamond to 40 million parts other rock.
But a diamond high-quality enough to be in an engagement ring is the product of the removal and processing of 200 to 400 million times its volume of rock!
The diamond’s most incredible attribute, however, is its durability. It is the hardest substance found in nature, four times harder than the next hardest natural substance, corundum (sapphire and ruby).
The grit in a regular rock tumbler wouldn’t have much effect on a diamond! It also has the highest melting point and conducts heat five times better than the second-best element, silver.
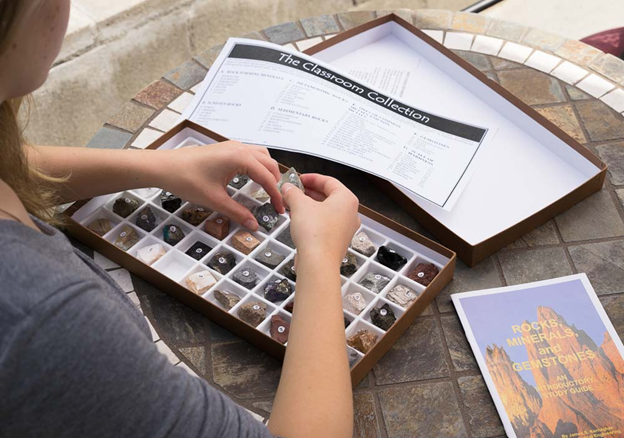
Starburst Rock Cycle Science Project
Have you ever made a rock collection? Part of the fun is gathering as many different rocks as you can find. But even though rocks come in many different colors, shapes, and sizes, they all fit into one of three categories based on how they were formed. Learn about the rock cycle steps, the three main types of rocks, and what happens when rocks get so hot that they melt!
What You Need:
- Starburst candy (assorted colors)
- Adult’s help
- Scissors
- Heat source (like a toaster oven, hot plate, blow dryer, etc.)
- Tongs
- Wax paper cut into a 6-8” square
- Aluminum foil cut into an 8-10” square, or a weighing boat
- Rock cycle chart
What You Do:
.jpg)
1. Unwrap four different-colored Starburst candies. Have an adult use the scissors to help you cut each piece of candy into 9-12 pieces.
.jpg)
2. Pile up the pieces and mix them around.
.jpg)
3. Next, rub your palms together back and forth quickly for several seconds. Then pick up the pile of candy and push the pieces together to form a ball. Your ball should look lumpy with the candy pieces visible.
4. Next, have an adult help you use your heat source to soften the lumpy ball of candy. Once it’s slightly heated but not too hot to handle, place it in the middle of your square of wax paper and fold the paper in half over it.
.jpg)
5. Once the candy lump is inside the wax paper, it’s time to apply pressure. Some ideas include rolling it with a rolling pin, placing a pile of heavy books on top of it, stepping on it, or whatever else you can think of! After you’ve mashed it well, remove the candy blob from the wax paper and fold it up. Then put it back in the wax paper and repeat the process of applying pressure, this time trying a new technique if you want. When you remove the Starburst from the wax paper now, it should be soft and pliable, so you can easily roll it into a ball.
.jpg)
6. If using foil, fold each side up to fashion a dish and place the candy blob inside.
.jpg)
7. Have an adult help you use your heat source to apply enough heat to completely melt the lump of candy. You’ll know you’ve heated it sufficiently when the candy is liquified. (Do not put aluminum in a microwave!).
8. Have an adult use tongs to remove the foil container from the heat source and place it somewhere out of reach to allow it to cool.
.jpg)
9. Once it’s cool enough to handle, carefully peel the candy from the foil. How is the candy different now?
What Happened:

We classify the three main types of rock (sedimentary, metamorphic, and igneous) based on how they’re formed. The rock cycle is the entire process of forming rocks, and like a circle, it has no beginning or end.
In this rock cycle project, we simulated the formation of sedimentary rocks by pressing the pieces of Starburst into a lump. We simulated the formation of metamorphic rocks by adding heat and pressure in steps 4 and 5.
The final three steps of the project show how igneous rocks are formed. Since the rock cycle steps are continuous, do you think you could use your igneous “rock” from the final steps and start the whole project over? Give it a try!
Explore More Rock Experiments and Geology Science Projects
For more fun studying and experimenting with rocks check out these geology science projects: