Milk Casein Plastic Project
What You Need:
- whole milk
- white vinegar
- 2-cup glass measuring cup
- a teaspoon
- spoon for stirring
- microwave
- pot holder
- paper towels
- fine mesh strainer
- an adult to help
What You Do:
1. Make a stack of 5 or 6 layers of paper towels.
2. Pour 1 cup of milk into your glass measuring cup.
3. With an adult’s help, microwave the milk for 1 minute. You want it to be heated through but not boiling, heat for another 20-30 seconds if needed.
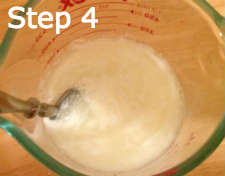
4. Use a potholder to remove the cup. Add 4 teaspoons of vinegar to the milk and stir gently. There should be solids floating around in the cup. (Warning: it’s a bit stinky!)
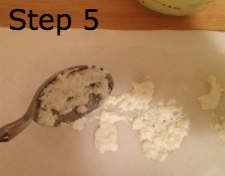
5. Use your spoon to scoop out as many of the solids as you can onto the stack of paper towels.
6. Once you have removed most of the solids, carefully strain the liquid through a fine mesh strainer into the sink or a bowl.
7. Dump the solids left in the strainer onto the stack of paper towels and gently pat them dry (use more paper towels if necessary to soak up as much moisture from the solids as you can).
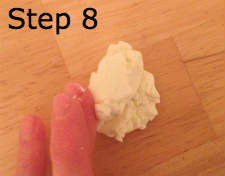
8. When the solids are fairly dry, gather them together and knead them in your hands or on a table into a smooth ball.
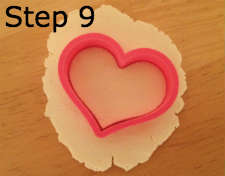
9. Once it is smooth, you can mold the pliable dough into shapes. Try rolling it flat and using cookie cutters to shape it, press it into play dough molds, form it into beads (use a toothpick to make holes), or just shape it with your fingers.
10. Set your shapes on a sheet of waxed paper and leave them out to dry for a few days until they become hard like plastic. (Note: keep in mind that the shapes will warp slightly and possibly even crack as they dry, so don’t expect your shapes to be perfect when they’ve hardened.)
11. Remove any remaining solids from your dishes with a paper towel before washing with soap and warm water.
What Happened:
When you mixed vinegar with milk and heated it, the milk curdled or separated into curds (the solids) and whey (the liquid). Curds are the fat and casein (protein) from the milk. They form together in chains known as polymers. All plastics are polymers. The casein chains you formed in this experiment will harden into a type of plastic. In the early 1900’s, casein plastic like this was used to make many plastic objects including buttons and jewelry.
You could also try this experiment with different types of milk (we got an interesting rubbery substance with skim milk) and different amounts of vinegar to see what kind of effect it has on the polymer that results.
For Valentine’s day, we made the plastic dough into heart shapes and beads! You may also like to try adding food coloring as you knead the dough (please get an adult’s permission and wear disposable gloves to protect your hands from the dye) or try painting the plastic after it hardens.
Science Lesson
A polymer is a long chain of hundreds or thousands of tiny molecules. Polymers are generally very large molecules made up of lots and lots of smaller molecules all linked together. The plastic you made is an interesting type of polymer made up of chains of casein from milk.
Sometimes in order to be useful, polymers must be cross-linked with chemicals. In the case of natural rubber for example, the chains of rubber (a natural polymer) are cross-linked with sulfur in a process called vulcanization where the chains of polymers are connected together into one larger molecule. This makes the rubber more durable, more flexible, less brittle, and able to withstand heat better than natural rubber!
There are lots and lots of polymers in our world. Some are natural and some are made by humans, or synthetic. Here are a few examples of polymers: Plastic is one of the most common polymers. There are many types of plastics that have very different properties—some plastics are flexible and can be bent (like a plastic bag or a toothpaste tube). But some are very solid and would split or crack if you tried to bend them (like a plastic plate or a CD). Fabric polymers, such as rayon, nylon, and polyester, are used for making clothes such as shirts, sweaters, and socks. Natural polymers – one of the most important natural polymers is DNA, the protein in your cells that makes you who you are! Some other things that come from naturally-occurring polymers are cotton, silk, rubber, paper, and leather. Rubber comes from a natural source—a plant! But before it can be used, it has to be processed or vulcanized.
Here are a few other interesting polymers you might find in your home:
- Liquid absorbing crystals known as sodium polyacrylate are the material found inside of disposable diapers. This special polymer can soak up lots of liquid, making it perfect to keeping diapers from leaking!
- Bathing suits and toothbrush bristles are typically made from a man-made material called nylon, which is also a polymer known as polyamide.
- Lenses for eyeglasses are often made from a durable polymer called polycarbonate. It is lighter and can be made thinner than glass lenses. It is also less breakable than glass.
- Have you heard of PVC? PVC stands for polyvinyl chloride. PVC is used for many things, like shower curtains and waterproof materials. Even credit cards are made from a type of PVC.
- Glue, paint, varnishes, and sealants are also made up of polymers.