Winter Science Projects for Kids: Cool Projects to Brighten Cold Days
We have several exciting and educational winter science projects for kids, combining fun and learning through hands-on experiments!
Make a Human Sundial: A Fun Shadow Experiment
In the first of many winter science projects for kids, you can take part in a human sundial experiment to find out if our days are shorter during winter!
Using sidewalk chalk, draw a big circle on the ground and use your shadow to mark different hours of the day.
What You Need to Make a Human Sundial
- A large space outside, like a driveway or playground
- Sidewalk chalk (or spray bottle and food coloring)
- Meter stick or yardstick
- Compass
- An adult helper
What to Do to Make a Human Sundial
1. Use the compass to find which direction is north (N). Have an adult help you line up the meter stick on the ground so that one end points the same way as the arrow on the compass.
2. While your helper holds the meter stick, trace a line with chalk from one end to the other. Write “N” at the top of the line that points north like the arrow on the compass. If there is snow on the ground, you may want to use a spray bottle to draw a line instead. Fill it up with water then add a few drops of food coloring. Squirt the colored water onto the snow to make a line.
3. Turn the meter stick the other way, so it crosses through the middle of the first line you made. While your helper holds it still, draw another line next to the meter stick.
4. Draw a circle around the giant “X” you just made.
5. When the sun is out during the middle of the day, stand in the middle of the circle, at the point where the two lines cross.
6. Notice how long (or short) your shadow is, and where it is at in the circle when you are facing north.
7. Have a helper trace your shadow with chalk, and write the date, and time of day.
8. The next day, go out at the same time of the day. Stand in the middle, face north, and have your helper trace your shadow again.
9. Repeat step 8 as many times as you like, be sure to write the date for each shadow being traced.
What Happened
Did the length of your shadow change between days? December 21st is the shortest day of the year. The sun is the lowest in the sky that it will be all year long, so it doesn’t take as long for it to rise from the east and set in the west, making the amount of light we get during the day shorter. If you stood in your sundial and traced your shadow at noon each day, you probably noticed that your shadow was a little bit shorter each day. That’s because after December 21st, the sun will be just a little bit higher in the sky each day, so it will be closer to straight over your head at noon.
Take a Nature Walk to Learn About Animals in Winter
So, what do animals do differently during the winter? Well, take a walk and observe animals to find out how they live during the winter!
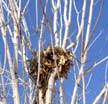 With an older sibling or adult, take a walk around your neighborhood. Start by walking around your house and yard. If there is snow on the ground, look around trees, flower beds, and fences for tracks that animals may have left. On the other hand, if there isn’t any snow, look for areas with mud or soft ground and look for tracks there. Can you guess what animals might have made the tracks? Do you see any other signs of animals? Try to remember all the different animals that you see on your walk; you may even want to write about them or draw pictures of them in a notebook as you go. Additionally, think about where each of those animals might live and how their homes help them survive the winter.
Here are some things to look for on your walk
- Animal tracks in snow or mud
- Tunnels or holes in the snow (sometimes, animals dig holes in the snow to get to the ground to look for food like leaves or insects)
- Bark on trees that have been scratched or chewed
- Holes in the ground where animals might live (called burrows)
- Nests in trees, on telephone poles, or around houses and buildings (squirrels and birds both like to build nests in trees)
- Holes in trees or caves in rocks where animals may live
- Things that could be sources of food for animals (such as mice, squirrels, chipmunks, rabbits, birds, and any other animals you see)
Things to Think About
- If you were an animal, where would you make your home for the winter? Why did you choose that spot?
- Why do you think it is harder for animals to find food in the winter?
- What are some ways that animals can stay warm when it gets really cold?
More Winter Science Projects for Kids: Frosty Can Fun
We hope you enjoyed the sundial experiment. More winter science projects await!
Have you ever seen a thin layer of ice on the ground on a cold morning? That is called frost! In this experiment, you can create your own frost and learn why it happens.
What You Need for the Frosty Can
- An empty coffee can with a lid (see note* below)
- Ice cubes
- Salt
*Note: Instead of a coffee can, you can use a smaller can, some cardboard, and tape. Before you begin, trace around the bottom of the can on the cardboard and cut out the circle. Stir the ice and salt in step 2, then put the circle over the can and tape it all around the edge.
What to Do for the Frosty Can
1. Fill the can up with ice cubes.
2. Pour about 1/2 a cup of salt over the ice (or about 2 tablespoons if you use a smaller can).
3. Put the lid on the can and shake the ice and salt really well while counting to ten.
4. Set the can down and watch what happens.
What Happened
In order for water to become ice, it needs to get below 32 degrees. That temperature is called the freezing point of water. When water gets to 32 degrees, it starts to freeze. When ice gets warmer than 32 degrees, it starts to melt. Salt makes the freezing point of water lower, so that it would have to be even colder to become ice, but ice doesn’t have to get as warm to start melting into water! Adding salt to the ice in the can lowered the freezing point so that it would have to be MUCH colder than 32 degrees for the ice to stay frozen.
When you covered the can and shook it up, the salt mixed with the ice and the air inside the can got really cold (but not cold enough to keep the ice from melting, because salt gave it a colder freezing point!). Then, because it was so cold inside the can compared to the temperature outside of the can, tiny ice crystals, called frost, formed on the outside of the can.
Understanding How Moisture in the Air Freezes
Since ice comes from water, where did the water that formed the frost come from? Well, it came from moisture in the air. Most air has some moisture, or tiny droplets of water, in it. The can got so cold that the tiny droplets of moisture in the air around the can got cold enough to freeze when they touched the can!
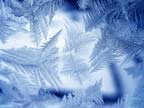 Frost happens a lot during the winter. For instance, you may wake up on a cold morning to find that everything outside is covered by a thin layer of pretty, white ice crystals. That is frost. If you have old windows on your house, you might see frost form on them on very cold days. The picture to the right is a close-up view of frost on a window.
An HST Project Favorite: The Expanding Bottle
The Expanding Bottle experiment is one of our favorite winter science projects!
So, what happens to water when it gets really cold? Do this simple experiment to see!
What You Need for the Expanding Bottle
- Empty plastic soda bottle and cap (any size)
- Water
- A freezer
What to Do for the Expanding Bottle
1. Fill the bottle up to the very top of the rim with water.
2. Screw the cap on tight.
3. Put the bottle in the freezer and leave it overnight. If it is below freezing (32 degrees) outside, you can put the bottle outside your door instead.
What Happened
By morning, you should find that all of the water has frozen solid and that the plastic bottle has been stretched and now has a funny shape to it. When water freezes, it expands or takes up more space. Since you filled up the bottle to the very top, there was not really anywhere for the water to go when it froze and expanded, so it pushed out against the sides of the bottle and made the bottle bulge out. In fact, it’s possible that your bottle even exploded as the water froze because it expanded so much! Have you ever seen cracks in a sidewalk and wondered what caused them? Water gets into tiny holes in concrete and when it freezes, it expands and pushes against the hole it’s in and can sometimes crack the concrete!