Knowing how to build an igloo is a great way to combine winter fun with hands-on science and creativity. Whether you’re making a full-size snow igloo outside or a smaller ice cube igloo indoors, this guide will walk you through the steps, materials, and safety tips you need to succeed.
You’ll learn how snow acts as an insulator, how to shape bricks for a sturdy dome, and why igloos can keep you warm even in freezing weather. Ready to discover the magic behind building your own igloo? Let’s dive in!


How to Build an Igloo:
Full Size Igloo
What You Need:
- Adult supervision
- Hard, packed, dry snow
- Rectangular plastic storage tub or other suitable mold
- Friends to help
- Snow shovel
Safety first: NEVER build an igloo alone! Make sure someone is with you at all times, so if it collapses, you won’t be trapped.
Part 1: Make Snow Bricks
Instructions:
1. NEVER BUILD AN IGLOO ALONE! Make sure someone is with you at all times, so if it collapses, you won’t be trapped.
2. Then, use your plastic storage tub or mold to shape snow bricks. The size of the igloo you build will determine the number of bricks you need. Building igloos is hard work, so you may want to build one only big enough to accommodate two seated people. If you’re ambitious, try to build it big enough to lie down inside!
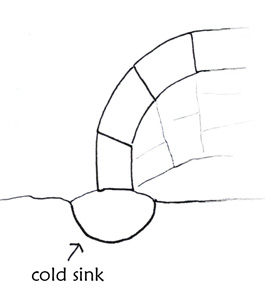
3. Use your shovel to dig out a pit from the area where you got the snow for your bricks. This will be your cold sink hole and entrance, so it doesn’t have to be very large—perhaps a third of the size of your igloo’s floor space and a foot or so deep. It will be like a short tunnel that you crawl down into, then back up to enter the igloo. (see illustration above)
Part 2: Build an Igloo
What You Do:
1. Now starting at one edge of the sink hole, flatten out a circular span of ground. A fun way to do it is by making a snow angel. This flat area should be the size you want your igloo to be.
2. Then, assemble snow bricks in a circle around the edge of the flattened ground. This is the base of your igloo’s walls. Also, make sure the igloo is accessible via the sink hole entrance. You may need to dig it out a bit more.
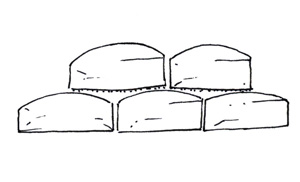
3. Stack another row of snow bricks atop the first, overlapping blocks and packing loose snow in the gaps as you build up and shape the walls into a dome. Be sure to leave small gaps here and there to allow air in, so you can breathe inside your igloo.
4. For the final brick or cap, you’ll need a brick slightly larger than the hole. FIrst, have your adult supervisor or friend help you set it in place. Then, have one person go inside the igloo and wiggle and shape the brick to fit snugly. You may have to chisel it down a bit.
5. Continue to fill the cracks (but not all of them!) with loose snow. In particular, leave a hole near the top.
6. From the inside, smooth the walls out and create grooves running floor-to-ground. These will catch water as it melts, so it flows down and doesn’t drip on you.
7. Finally, with adult supervision, bring a candle inside and light it. This will melt the walls a bit, strengthening your igloo when they refreeze. At night, pour a glass of water over the top of your igloo to strengthen it from the outside too.
What Happened:
The snow acts as an insulator, that is, something that is a poor conductor of heat or electricity. So the heat in the igloo, from body temperatures, candles, etc., can’t escape through the snow walls. But what about the cold air? After all, the temperature must be below freezing (32° F) in order to build an igloo! That’s where the sink hole comes in.
First, since the cold sink is lower than the rest of the igloo’s floor, cold air settles into it while warm air rises, filling the rest of the igloo. This occurs because warm air is less dense than cold air since its molecules are more spread out than those in cold air. Second, the angle of the sinkhole means that wind can’t blow straight into the igloo like it would if the entrance was level to the rest of the igloo. All these factors work together to make the air inside an igloo as much as 40-50 degrees warmer than the ambient temperature. The small hole in the top of the igloo allows the hottest air to escape, which is why the igloo doesn’t melt completely.
Read more about insulation with this Baked Alaska edible science project that shows how ice cream goes in the oven without melting!
How to Build an Igloo
Ice Cube Igloo*
What You Need:
- 2-3 ice cube trays
- Salt
- Water
- Slushy mix (made with a few ice cubes and tablespoons of water in the blender)
- Baking sheet
- Teaspoon
- Freezer space
Instructions:
To make an igloo with ice cubes, you’ll need around 50 ice cubes in various sizes. Make half the ice cubes full sized. The other half should be assorted sizes made from filling the ice cube trays half and three-quarters full.
1. Sprinkle salt on the cookie sheet. Make a circle with 12 ice cubes and place in the freezer till completely frozen.
2. Then, for the second row, dip one side of each ice cube the salt. Center each cube, salty side down, on the seam between two cubes from the bottom row (like brick walls). Use the slushy mix to carefully fill the gaps. Refreeze. (see above)
3. Repeat step 2 making each successive layer with smaller and smaller cubes. Each new row should be smaller than the one before, creating a dome. Refreeze as necessary. Continue until only a small hole in the top center remains.
4. Make a door two with parallel rows of ice cubes and smaller ice cubes placed on top. Use slushy mix to fill the gaps.
5. Carefully pat a thin layer of slushy mix over the entire igloo and then refreeze for 2-3 hours.
What Happened:
When creating an igloo from ice cubes, the salt works as an adhesive. First, the salt melts the ice cube where you dipped it. The melted part then “sticks” to the frozen cubes below. The salt works by lowering the freezing point of the ice cube. Freshwater freezes at 32°F, but saltwater freezes at 28.8°F. So, the ice melts.
*This how to build an igloo with ice cubes project was adapted from www.scifair.org.