Rainbow Science Project: How to Make a Spectroscope at Home
If you ever wondered what makes a rainbow or how scientists study light, learning how to make a spectroscope is a fun place to start! A spectroscope is a simple tool that breaks light into individual colors, revealing the hidden spectrum inside everyday light sources. In this project, you’ll use basic materials, such as a cardboard tube, black construction paper, and a diffraction grating. With these materials, you will build your own spectroscope and explore the colorful world of visible light. Get ready to see light like never before!
Make a Spectroscope: Step-by-Step Instructions
What You Need:
- Cardboard tube from a toilet-paper roll
- Black construction paper
- Tape
- Scissors
- Diffraction grating
Instructions:
1. Line the inside of the cardboard tube with black construction paper.
2. Cut two circles out of the construction paper. Make them slightly bigger than the cardboard tube. In the middle of one of the circles, cut a square with sides about 1.5 cm long. Tape the diffraction grating over the square hole. Then, tape the circle over one end of the cardboard tube with the diffraction grating on the inside.
 3. The center of the other circle needs to have a very narrow slit for light to enter through. Since cutting this can be difficult, just make a rectangular hole about 2.5cm long. Then tape two rectangles of black paper over the hole, leaving a narrow slit between them. It’s a good idea to cut your rectangles from the edge of the paper to achieve straight edges to use for the sides of the slit. (The right-hand photo shows this step using a white circle so you can easily see how to line up the rectangles.)
4. Hold the slotted circle over the other end of the cardboard tube. Then, look through the grating end at a light source. You should see a color spectrum on the inner side of the tube. (There might be one on either side of the slit.) It may be narrow. So, turn the slotted circle until the spectrum widens out, and then tape the circle in place.
Spectroscope in Action
You now have a working spectroscope! Use it to look at different types of light. Perhaps look at a normal incandescent light bulb, a fluorescent light, an LED light, a glow stick, or even sunlight. (But be very careful. Do NOT look directly at the sun through your spectroscope!) You can also look at the flame of a match (if someone else holds it for you).
Spot the Differences
Do you see a difference in each light’s spectra? Incandescent light bulbs and sunlight produce a continuous spectrum, where all colors merge smoothly into one another. (Stars actually emit a dark-line spectrum, which has the colors broken up by dark lines. Only very precise spectroscopes can see the dark lines, however, so the sun looks like a continuous spectrum.) A fluorescent light produces a bright-line spectrum, characterized by bright lines separated by dark spaces. Try drawing each spectrum with colored pencils and comparing them. You can also try varying the width of the slit – does that change the appearance of the spectrum?
What Happened:
Each color that light is made of has its own wavelength, which reflects and refracts at its own angle. When light hits the diffraction grating, it is reflected onto the wall of the spectroscope. All the little grooves on the grating separate the colors, allowing them to reflect at their different angles. The beam of light hits the diffraction grating at one angle. Each color bends back at a different angle, spreading out along the spectroscope wall, which then allows you to see them. Keep reading to find out more about the visible spectrum of light and get answers to some classic science questions!
Visible Light Science Lesson
Why Is the Sky Blue?
One of the most beautiful things about our world is a blue sky on a clear, sunny day. Have you ever seen pictures of the Apollo astronauts on the moon? If so, you might have noticed that the sky was black, even on a bright, sunny day. What makes the difference? Why is Earth’s sky blue?
Unlike the moon, the earth is surrounded by an atmosphere. The atmosphere is a mixture of gasses, mostly nitrogen and oxygen. The way the sun’s light travels through the atmosphere makes the sky colored.
The Science Behind Sky Color
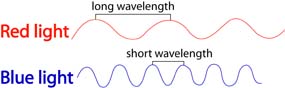
It doesn’t look like it, but light is composed of several different colors, much like those seen in a rainbow. Each of these colors travels in a wave, but the wavelength (distance between the tops of each wave) varies. Red light has a long wavelength, while blue light has a much shorter wavelength. When light from the sun enters our atmosphere, the waves collide with gas molecules. The longer wavelengths, like red and yellow, pass straight through and appear to us as “regular” sunlight. Shorter wavelengths, like blue, bump into the gas molecules and scatter in different directions. Some light passes through, but most of it scatters back, making the sky appear blue.
You can see similar light scattering by mixing half a teaspoon of milk with a large (quart-size) jar of water. In a darkened room, shine a flashlight through the jar and look at the water. It should have a bluish tint. Why? Because the milk particles are scattering the blue light from the flashlight just like the gas molecules in our atmosphere do.
The Science Behind Sunset Colors
Maybe you’re asking a follow-up question: why are sunsets pink and orange? When the sun is near the horizon, its light travels through more atmosphere. The blue light scatters away, leaving reds and oranges to reach our eyes. Clouds or pollution can make sunsets even redder by scattering more of the shorter wavelengths.
Add a little more milk to your jar – do the extra milk particles allow you to see an orange tint? Try looking in the side of the jar directly opposite where the flashlight is. This is like looking at the sun on the horizon.
Why Do Stars Twinkle?
If we lived on the moon, we probably wouldn’t know the song, “Twinkle, Twinkle, Little Star.” Just like blue sky, a star’s twinkle is a result of Earth’s atmosphere. Stars don’t twinkle in space! As the light from a star enters the atmosphere, it hits gas molecules and scatters. Since the star is so far away, we only see a tiny beam of light from it. This beam gets scattered away from our eyes and then back into them, almost like it is blinking on and off. It happens so fast that it just looks like it is twinkling. (Planets are closer to us and send more light. If some of the light beams are scattered away, others still get through to us, so planets don’t usually twinkle.)
Stars twinkle more when close to the horizon because the light must travel through a greater amount of atmosphere before reaching our eyes. Weather can affect how much stars twinkle, too. Cold air scatters more light than warm air, because molecules are closer together in cold air. This makes it harder for light to pass through without interference. (Think about how it’s harder to walk in a straight line through a crowd of people than an empty room!)
What Affects Stargazing?
The temperature variation in the atmosphere affects what astronomers refer to as “seeing.” If there is a lot of variation, even a perfectly clear night will be bad for stargazing with a telescope. You might be able to see a twinkling star clearly with your naked eye. However, an astronomer will say it’s “bad seeing” because it’s hard to study a star that won’t stop flickering! Next time you’re outside on a clear winter night, look for twinkling stars near the horizon. If you have a telescope, you may see the stars changing colors because their wavelengths are scattering in different directions.