You know the mesmerizing feel of watching a lava lamp, with its large colored bubbles sinking and rising and morphing. With this project, you can make your own (temporary) lava lamp with household materials! It’s easy and safe, and it looks very cool.
Check out our project video to see the homemade lava lamp in action!
What You Need:
- Flask or bottle
- Vegetable oil
- Water
- Food coloring
- Alka-seltzer
What You Do:
1. Fill the flask most of the way with vegetable oil.
2. Fill the rest of the flask with water. The water will sink to the bottom under the oil.
3. Add a few drops of food coloring; your choice of color. The food coloring is water-based, so it will also sink and color the water that is now at the bottom of the flask.
4. Break an alka-seltzer tablet into a few small pieces, and drop them in the flask one at a time.
5. Watch your lava lamp erupt into activity! As the reaction slows down, simply add more alka-seltzer.
What Happened:
A lava lamp works because of two different scientific principles, density and polarity.
- Density is the measurement of how compact a substance is – how much of it fits in a certain amount of space. (The scientific equation is density = mass/volume.) If you measure an equal volume of oil and water, you’ll find that the water is heavier than the same amount of oil. This is because water molecules are packed more tightly and a cup of water actually has more mass than a cup of oil. Because water is more dense than oil, it will sink to the bottom when the two are put in the same container. Density is affected by temperature—the hotter a liquid is, the less dense it will be.
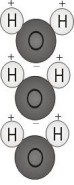 Polarity, in chemistry, applies to bonding. Water molecules are “polar” because they have a lopsided electrical charge that attracts other atoms. The end of the molecule with the two hydrogen atoms is positively charged. The other end, with the oxygen, is negatively charged. Just like in a magnet, where north poles are attracted to south poles (“opposites attract”), the positive end of the water molecule will connect with the negative end of other molecules. Oil molecules, however, are non-polar— they don’t have a positive or negative charge, so they are not attracted to the water molecules at all. This is why oil and water don’t mix, and always eventually separate!
Real lava lamps use a polar and non-polar liquid just like our homemade one did. In a real one, however, the densities of the liquids are much closer together than vegetable oil and water. The denser liquid sinks to the bottom, but the lava lamp light heats it up until it expands and becomes less dense, causing it to rise upward. As it gets farther from the light, it cools down, becoming more dense again until it sinks; then the cycle starts all over.
Instead of using a light, in our homemade lava lamp we used alka-seltzer to power the lamp. The alka-seltzer reacts with the water to produce carbon dioxide gas bubbles. These stick to the water droplets. The water/gas combo is less dense than the oil, so they rise to the top of the flask. At the top, the gas bubbles pop and escape into the air, allowing the dense water to sink back to the bottom again.
Lava lamps powered by heat are trickier to make and can use more hazardous materials. You can experiment fairly safely with things like rubbing alcohol and mineral oil or lamp oil. See if you can make a lamp powered by heat!
More Density Science Projects
Rainbow Density Column
Using a knowledge of liquid density, you can easily “stack” several liquids on top of each other! Use food coloring to make a rainbow of colors.
What You Need:
- Liquids of different densities: honey, corn syrup, dish soap, water, vegetable oil, rubbing alcohol
- Graduated cylinder or tall glass or jar
- Pipets (medicine droppers)
- Food coloring
What You Do:
1. Pour an inch (or however much you want) of honey into the bottom of the cylinder or glass.
2. Use food coloring to color a little bit of corn syrup (if it’s the light kind; just leave it brown if it’s the dark kind). Slowly and carefully pour an inch of the corn syrup on top of the honey.
3. Color some liquid dish soap and carefully add an inch on top of the corn syrup. You may find it easier to use a pipet for this one instead of pouring.
4. Next, use a pipet to add an inch of colored water on top of the dish soap.
5. You won’t be able to color the vegetable oil, because food coloring is water-based and water and oil don’t mix! Go ahead and add an inch of oil on top of the water.
6. Finish it off with an inch of colored rubbing alcohol. (If you have lamp oil, you could also add that to the very top.)
7. Voila – a beautiful rainbow of stacked liquids!
What Happened:
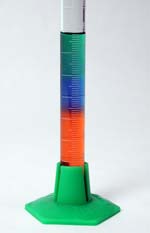
Each of the liquids you used had a different density. You added them to the cylinder in order of most dense (honey) to least dense (rubbing alcohol). Since each new liquid was less dense than the one before it, it floated on top instead of mixing together. You can try other liquids, if you want to! To figure out where your new liquid would fit in the column, you can measure the density of all the liquids. Measure an exactly equal volume of each liquid and weigh it (be sure to subtract the weight of the container). Even though the amount of liquid is the same, the denser ones will be heavier. (Density = mass/volume.)
There are many different things that affect density, such as temperature. Heat causes substances to expand and become less dense, while cold causes them to contract and become more dense. (One exception is water – it becomes more dense with cold until the freezing point, but it freezes in a crystalline structure that makes ice less dense than liquid water.) Adding things to a liquid will also change its density. For example, salt water is more dense than regular water (which is why it’s easier to float in salt water than in fresh water!). You can try building a density column using only colored water. Try stacking hot, cold, and room temperature water, or try building a column with salt water, sugar water, and fresh water.
Now that we’ve explored the fascinating world of density columns in our previous experiment, it’s time to take our learning to the next level with a fun and delicious twist! In this exciting adaptation, we’ll be using everyday coffee ingredients to create a coffee-themed density column. This hands-on experiment not only builds on our understanding of density but also adds a flavorful twist to our scientific exploration. So, grab your lab aprons and get ready to brew up some knowledge as we dive into the world of coffee and chemistry!
Coffee Density Column
If you’re like us and love coffee almost as much as science, try this density column adaptation with coffee ingredients.
Layer the following ingredients carefully from the bottom up:
-Honey
-Your favorite flavor syrups
-Low fat Milk
-Coffee
-Whipped Cream
More Fun Projects:
- Check out the science of scuba divers and submarines when you make a cartesian diver
- See how density affects the weather when you make a colorful convection current
- See the difference salt can make when you simulate the density of the Great Salt Lake
Density Science Lesson
Forget the life jacket. The Dead Sea contains the saltiest water on earth, which is also the densest water found naturally on earth! You don’t need flotation devices if you are swimming in the Dead Sea. Your body’s density is already much less than the water’s, so the only thing you can do is float higher than you ever would in fresh water!
Freeze and float. Most liquids contract when they freeze, making them more dense in their solid form than in their liquid form. (They have the same mass, but it’s packed into a smaller volume.) Water does the opposite: it expands as it freezes, lowering the density. Since ice is less dense than water, it floats. And it’s a good thing it does! If water acted like most other liquids, lakes and rivers would freeze solid and all life in them would die. Instead, a layer of ice forms on the surface, leaving liquid water underneath.