Ever heard about gram staining and antibiotics? Here’s how it started. In 1884 Hans Christian Gram, a Danish bacteriologist, attempted to find a universal stain that would work with all bacteria. In the process, he discovered that bacteria could be divided into two different groups — one that retained a stain, called ‘gram-positive,’ and one that didn’t, called ‘gram-negative.’ His unique method for identifying these two groups became the first step in any bacterial identification process. Even the simple determination that a bacteria specimen is gram-positive or gram- negative can direct a doctor in diagnosis, as different bacteria cause different diseases. For example, the bacteria that causes scarlet fever is gram-positive, while that which causes typhoid or cholera is gram-negative.
Gram staining helps doctors make a diagnosis, but can it also help suggest a cure? What is the relationship between gram classification and antibiotic use? Do common antibiotics interact differently with gram-positive and gram-negative bacteria? Answer these questions through experimentation.
Question: Will four common antibiotics (Penicillin, Ampicillin, Neomycin, and Erythromycin) have the same effect on both gram-negative and gram-positive bacteria?
Observe/Gather Data: Do some research to find information about antibiotics and gram staining, so that you can make an informed hypothesis.
Hypothesis: Based on your research, write a detailed hypothesis predicting the answer to the question.
Experiment: An experiment to test your hypothesis will need two parts. In part one, perform a gram stain on bacteria cultures to determine which are gram-negative and which are gram-positive. In part two, set up a controlled experiment to measure the effect of each type of antibiotic on each type of bacteria. Working with chemicals and bacteria can be hazardous. Before you start, read the following safety note.
Safety Note
Chemicals
Often the chemicals used to prepare slides may be toxic, corrosive or have other related hazards. Always carefully read the entire label before using a chemical. Be sure you understand the hazards involved, the proper safety equipment to wear, and what you will do in case of a spill or contact with your skin. The stains used for the gram stain process will discolor clothing and skin. Basic safety equipment that you should wear include safety goggles (splash type), chemically resistant gloves, and a chemically resistant lab apron. Work in a clean, well ventilated, uncluttered area where you can quickly wipe up spills. Always keep chemical bottles tightly capped.
Bacteria
While most environmental bacteria are not harmful to healthy individuals, once concentrated in colonies, they can be hazardous. To minimize risk, wear disposable gloves while handling bacteria, and thoroughly wash your hands before and after. Never eat or drink during bacteria studies, nor inhale or ingest growing cultures. Work in a draft-free room and reduce airflow as much as possible. Keep petri dishes with cultured mediums closed—preferably taped shut—unless sampling or disinfecting. Even then, remove the petri dish only enough to insert your implement or cover medium with bleach or 70% isopropyl alcohol. When finished experimenting, seal dishes in a plastic bag and dispose. Cover accidental breaks or spills with bleach or alcohol for 10 minutes, then carefully sweep up, seal in a plastic bag, and discard.
Part One – Gram Stain
What You Need:
- Live bacteria cultures – Bacillus Cereus and Rodospirillum Rubrum. (You could also grow your own cultures with agar and petri dishes)
- Inoculating needle
- Gram stain kit (contains crystal violet stain, Gram iodine stain, ethyl alcohol solvent, Safranin O counterstain, plain microscope slides, medicine dropper, coverslips)
- Wash bottle
- Compound Microscope
What You Do:
Some of the steps of the gram stain process are hard to carry out perfectly. To practice, it is a good idea to make a ‘control’ slide. Try collecting some bacteria from between your teeth (using a toothpick) and placing it on a slide with a drop of water. If the Gram staining procedure is done correctly, your slide should have a mixture of gram-negative and gram-positive cells as well as some neutrophils (white blood cells) with pink nuclei. After you have tried that, stain each of your live bacteria cultures using the following procedure:
1. Sterilize your inoculating needle by placing it in a candle flame. Let it cool for 3-5 seconds.
2. Make a specimen smear by placing a small amount of bacteria from one of the cultures on a clean glass slide with the inoculating needle. Take another slide and use its edge to scrape or ‘smear’ the specimen into a very thin film of material.
3. Let the specimen on the slide air dry, and then heat fix it by passing the slide through a candle flame 3-4 times. (The slide shouldn’t get too hot to touch, and it should never stop as it passes through the flame.)
4. Cover the specimen with 1-2 drops of the crystal violet stain for 60 seconds and then gently wash it off with very slow running water from the tap or a few gentle squirts from a wash bottle. (If the water is running too fast and hits the slide with too much force, the specimen will be washed off.)
5. Cover the specimen with a few drops of Gram’s iodine for 60 seconds; then gently wash the specimen again as in step 4.
6. Use ethyl alcohol as the solvent. This is the most sensitive step, because if the ethyl alcohol is left on the specimen too long, it will decolorize the gram-positive cells as well as the gram-negative. Tilt the slide slightly and apply the alcohol drop by drop onto the slide above the specimen, so that the alcohol runs down over the entire specimen. Stop applying the alcohol when the fluid flowing off the edge of the slide is no longer colored. The thinnest parts of the smear should be colorless. This will take about 5 seconds. Wash the slide gently again. Note that gram-positive cells will retain some of the violet coloring, but the majority of the stain will be rinsed away by the solvent.
7. Cover the specimen with a few drops of safranin stain as the counter stain for 60 seconds and then gently wash once more.
8. Blot the slide with absorbent paper (a paper towel will work if you have nothing else), but do not rub the specimen smear. Put a coverslip over the smear.
9. Now you are ready to examine your slide under a microscope at each magnification level. As you do so, look for cells that are purple in color. These are gram positive cells that retained the crystal violet stain. Cells that are pink or red in color are gram negative cells. In these cells, the crystal violet was washed away by the ethyl alcohol and replaced with the safranin.
Once you have determined which of your live cultures is gram-negative and which is gram-positive, label them clearly and move on to the next part of the experiment.
Part Two – Antibiotic Testing
One way to test bacteria susceptibility to antibiotics is to use the Kirby-Bauer or ‘disc diffusion’ method. This method involves measuring the inhibition of bacteria growth around an antibiotic disc placed in a culture.
What You Need:
- Gram-positive bacteria culture
- Gram-negative bacteria culture
- Inoculating needle
- Agar
- 2 sterile petri dishes
- Antibiotic discs (Penicillin, Ampicillin, Neomycin, and Erythromycin)
What You Do:
1. Prepare the agar according to the directions on the label, then pour 10-15 ml into each petri dish (enough to cover the bottom of the dish). Let the dish stand (covered) for about an hour until the agar is firm.
2. Sterilize your inoculating needle and then inoculate one dish with the gram-positive bacteria. Lightly zig-zag the needle over the surface of the agar, turn the dish, and do it again. Do this several times to get maximum distribution.
3. Place one disc of each antibiotic type at different places on the agar (use sterile tweezers). Press the disc down slightly to secure it in the agar. Cover the dish when you’re done.
4. Repeat steps 2-3 with the gram-negative bacteria.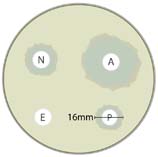
5. Examine each dish after 24 hours. If the bacteria culture grows right up to the edge of the antibiotic disc, it is not susceptible to that antibiotic. If there is a circular area around the disc where the bacteria growth is inhibited, measure and record the diameter of the circle. Make note of the effect of each antibiotic disc in each petri dish. You may also wish to take pictures.
6. Repeat step 5 after 48 hours.
7. When you are finished observing your bacteria cultures, put a tablespoon of household bleach into the dishes, cover them, seal them in a plastic bag, and throw them away.
Analyze Data/ Form Conclusions
Analyze your data. How did each antibiotic perform in each bacteria culture? Were the antibiotics more effective overall against gram-positive or gram-negative bacteria? What were the limitations of your study? Could you get more accurate results if you tested a larger number of bacteria cultures?
Form conclusions. Did your results support your hypothesis? Why or why not? What do your results tell you about the process of prescribing antibiotics? How could you continue this study to discover even more about the relationship of antibiotics and bacteria?
Don’t work with antibiotic discs if you are allergic to those forms of antibiotics.
The bacteria you work with can also be hazardous. Always wash your hands thoroughly before and after handling the bacteria cultures. Washing them before will minimize contamination of the bacteria cultures you are growing. Washing them afterwards will minimize your exposure to harmful bacteria that may be growing in your cultures.
When you have finished studying a culture, pour enough household bleach into it to cover the bottom of the dish. Then cover the culture, seal it in a plastic bag, and throw it away.
Additional Information:
- Looking for a microscope? Check out our affordable microscopes, such as the Home Advanced LED Microscope!