See for yourself how the forces of electricity and magnetism can work together by building a motor using simple materials! Electricity and magnetism are both forces caused by the movement of tiny charged particles that make up atoms, the building blocks of all matter. When a wire is hooked up to a battery, negatively charged electrons flow away from the negative terminal of the battery toward the positive end, because opposite charges attract each other, while like (similar) charges repel each other. This flow of electrons through wire is electric current, and it produces a magnetic force.
In a magnet, atoms are lined up so that the negatively charged electrons are all spinning in the same direction. Like electric current, the movement of the electrons creates magnetic force. The area around the magnet where the force is active is called a magnetic field. Metal objects and other magnets that enter this field will be pulled toward the magnet.
The way the atoms are lined up creates two different poles in the magnet, a north pole and a south pole. As with electrical charges, opposite poles attract each other, while like poles repel each other. Learn about electromagnetism and its many uses here.
Now let’s watch it work as we build a motor. (Note: This project requires adult supervision.)
>> Check out the project video to see the motor in action!
What You Need:
- Insulated copper wire
- Black permanent marker (such as a Sharpie)
- Scissors
- Small neodymium disc magnets
- D-size battery
- Battery holder (sticky tack or modeling clay can be used instead)
- Large rubber band (not needed if using a battery holder)
- 2 large paperclips
- Pen or pencil

Buy the supplies for this project in one convenient kit!
Build a Simple Motor Experiment Kit >>
What You Do:

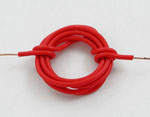
1. To make a bundle, wrap each end of wire several times around the loops to hold them in place. Position the ends so they are directly across from each other and extending out in a straight line on either side of the bundle, to form an axle. What you just made is called the armature.
2. Hold the wire bundle you have made so that it would be flat against a wall, rather than a table, and color the top side of each wire end using the marker. Leave the bottom side of each wire bare.
3. Carefully bend each paperclip, forming a small loop by wrapping one end around a small object such as a pencil or pen. Thick wire and pliers may be used instead of a paper clip if you want. Be sure to use caution when using the pliers.
4. If you are using a battery holder, attach a paper clip to either side, and insert the battery. If you don’t have a battery holder, wrap the rubber band tightly around the length of the battery. Insert the paperclips so each one is touching one of the terminals, and they are securely held by the rubber band. Attach the curved side of the battery firmly to a table or other flat surface using the clay or sticky tack.
5. Set one neodymium magnet on top of the battery, in the center. Position the armature in the paper clip loops, with the shiny, uncolored side touching the paperclips. Make sure it doesn’t touch the magnet.
6. If your motor doesn’t start immediately, try giving it a start by spinning the wire bundle. Since the motor will only spin in one direction, try spinning it both ways.
7. If your motor still is not working, make sure that the paperclips are securely attached to the battery terminals. You may also need to adjust the insulated wire so both ends are straight, and the bundle you have made is neat, with the wire ends directly opposite of each other.
8. With the motor spinning, hold up the other magnet, above the armature. As you move it closer, what happens? Turn the magnet over and try again to see what happens.
What Happened:
The armature is a temporary magnet, getting its force from the electrical current in the battery. The neodymium magnet is permanent, meaning that it will always have two poles, and cannot lose its force. These two forces – electricity and magnetism – work together to spin the motor. The poles of the permanent magnet repel the poles of the temporary magnet, causing the armature to rotate one-half turn. After a half-turn, the insulated side of the wire (the part you colored with permanent marker) contacts the paperclips, stopping the electric current. The force of gravity finishes the turn of the armature until the bare side is touching again and the process starts over.
The motor you created uses direct current, or DC, to rotate the armature. The magnetic force is only able to flow in one direction, so the motor spins in only one direction. AC, or alternating current, uses the same principle of electron flow, but the pole is rotating rather than in one place. AC motors are often more complex than DC motors, like the simple one you were able to make. Unlike a fixed DC motor, AC motors can switch the direction of rotation. (The DC motor you made is only able to spin in one direction because its direction is determined by the poles of the permanent magnet. If you turn the magnet over, so the other pole is facing up, it will change the direction the motor spins.)
When you held the second magnet over the top of the armature, it either stopped or made the motor rotate more rapidly. If it stopped, it’s because the pole was in the opposite direction of the first magnet, in a sense canceling out the rotation of the armature. If it moves faster, the same poles of the first and second magnets, which repel each other, work to spin the armature more quickly than with only one magnet.
Building Bigger, Faster Motors
Experiment with batteries of higher voltage, as well as more powerful magnets. You can also try using ceramic magnets. One design we found worked well was to set the armature over 4 ceramic ring magnets and connect the supporting paperclips to a 6V battery. You can also try increasing the size of the armature, and how many coils there are, to make a stronger electromagnet. When using batteries of higher voltage, and bare wires, be very careful. The circuit can emit enough heat to cause a burn if the wire is held too long.
Science Project Video – Build a Simple Motor
- For more fun project ideas, see our Science Project Videos page.
More Electricity Projects:
- Electromagnetism Experiments
- Electricity Experiments (including making a homemade battery!)
- Make a Light Bulb
Motors, Motors, Everywhere!
Without motors, your house would be without electricity!
AC motors are part of power plant generators that provide electrical supply.
Many small motors can be found in cars for power windows, heating, cooling fans, and windshield wipers.
Motors can also be found all around the house. Kitchen appliances like blenders and mixers use electric motors, as do household robots.
Most washer and dryer machines use an AC motor to be able to spin in either direction. DC motors can be found in DVD or CD players, and the disk drive of a computer. The vibrator in your cell phone also works because of a tiny DC motor.


