If you are using our chick egg incubator (BE-INCUBAT or LD-INCUBAT), you may wonder what to do when your chick hatches. It is important to follow the enclosed instructions carefully. First, don’t touch the incubator right away. The chick is very weak when it first hatches and will probably lie close to the egg for about eight hours before it starts to move around. Don’t try to feed it until it is completely dry and you have moved it from the incubator.
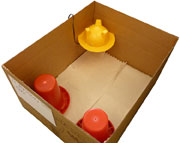
You can use a clean cardboard box as your brooder box. Line the box with newspaper, hay, or aspen shavings (available at pet stores) and put paper towels over top for the first 5 days. The paper towels give the chicks the traction they need to develop their legs.
Cut a slit in the corner of the box, about four inches from the bottom and about eight inches along each side. When your chicks have hatched, empty the incubator bowl and turn it upside down. With the light turned toward the center of the box, push the rim of the bowl into the slit in the corner.
Your eggs may hatch at different times. If a chick is getting active and you need to remove it from the incubator before the others are ready, hang a 40 or 60-watt light bulb over a corner of the box to provide light and heat. (Make sure it doesn’t touch the box, to avoid a fire hazard.) Another option is to set the box on top of a heating pad. As soon as you can, though, switch to the incubator so the chicks are getting light as well as heat.
The temperature under the light should be about 95-100 degrees Fahrenheit for the first week. The rest of the box can be a little cooler. Once all the chicks have hatched, you can use the thermometer from the incubator to monitor the temperature in the box. If the chicks huddle together under the heat source, they might not be warm enough, and if they stay away from it, the box might be too hot. Adjust the distance of the light or the wattage of the bulb until the temperature is right. After the first week you can raise the light to decrease the temperature by 5 degrees per week until the chicks have their feathers (usually 4 weeks for quail).
When transferring chicks from the incubator to the brooder, handle very carefully — do not squeeze the chick! Avoid handling them much for the first few days.
Fill a small jar lid with fresh water, and add gravel or marbles to the water to keep the chick from drowning. Fill a small dish of food also—use a starting mash from the feed store or you can buy a chick feeding starter kit complete with dishes and feed. Place the two dishes in the corner of the box for your chicks. Always make sure that your chick has clean food and water.
When the chicks begin to grow up and are too big to keep inside, please refer to your incubator instructions. When your chick gets too big for the house, DO NOT TURN THEM LOOSE. If you do not have the facilities to care for them, give them to a local hatchery, farm, Humane Society, feed or pet dealer. The incubator will come with complete hatching instructions and information on caring for your chicks when they hatch.