Geothermal Science Projects
Water Convection Science Project
Try this experiment to get an idea of where the hot water for hot springs comes from.
What You Need:
- 4 identical, clear, wide-mouthed jars (or just reuse 2 identical jars)
- Hot water
- Cold water
- Blue food coloring
- Red food coloring
- Two small pieces of thin tag board, index cards, or wax paper
- A place that is okay to get wet
What You Do:
1. Take your materials to the place that is okay to get wet.
2. Fill two of the jars to the rim with cold tap water. Place a couple of drops of blue food coloring in each jar (enough to make the water noticeably blue). Add a few more drops of cold water so that a bulge of water forms over the rim.
3. Fill the other two jars to the rim with hot water from the tap. Place a couple of drops of red food coloring in each jar (enough to make the water noticeably red). Add a few more drops of hot water so that a bulge of water forms over the rim.
4. Take one of the red jars and place the tag board on top, letting the water seal the tag board to the jar. Using one hand to keep the tag board on the mouth of the jar, quickly turn the jar over. The water seal will keep the tag board stuck to the rim and will prevent water from leaking out.
5. Place the upside-down jar on top of a blue jar. Align the two mouths of the jars together and then, holding both jars steady, have someone else carefully remove the tag board, keeping the mouths of the jars together as much as possible.
6. You should now have the red jar sitting upside down on top of the blue jar, both filled with their respective water. What do you notice about the water?
7. Now, take a new piece of tag board and place it on the second blue jar. Using the same method as before, place the second blue jar on top of the second red jar, making sure the mouths are aligned.
8. Remove the tag board and watch the water in the two jars. What happens to the water?
What Happened:
When the red jar was placed on top of the blue jar, the distinction between red water and blue water stayed fairly clear. But when the blue jar was placed on top of the red jar, there was a very rapid mixing of colors. Why is this?
Well, simply put, cold water is “heavier” than hot water. When the hot water is heated, the water molecules start moving around pretty fast and move apart from each other. The water molecules in the cold water, on the other hand, are packed closer together. So, in two equal size jars, more cold water molecules can fit in their jar than hot water molecules can fit in their jar. In scientific terms, the cold water is more dense than the hot water. So when hot water is placed beneath cold water, it will rise up while the cold water sinks down. This causes the mixing of the water you saw earlier. However, when the hot water is placed on top of the cold water, nothing moves because the hot water is already where it wants to be – at the top.
The water in hot springs generally originates as cold rain water or snow melt. This cold water sinks into the ground until it reaches a layer of rock that is being heated by a chamber of magma. The hot rock heats the water, and the hot water rises back up to the surface of the Earth in the form of hot springs. This cycle of cold water sinking and hot water rising is known as convection. (The same is true of air – hot air rises while cold air sinks.)
Fumaroles Science Project
Ever wonder why some fumaroles produce large amounts of steam, while others produce very little? Try out this experiment to find out one of the reasons! This experiment requires adult help and supervision.
What You Need:
- Medium saucepan
- Water
- Disposable tin pie pan
- Hammer
- Nail
- Oven mitts
- Stove or hot plate
What You Do:
1. Fill the saucepan about half full with water and place it on the stove. Heat it until the water is steaming but not boiling.
2. While waiting for the water to heat, take the pie pan and turn it upside down. Use the hammer and nail to gently put a small hole in the center of the pan.
3. Put the oven mitts on and place the pan right side up over the pot. What does the steam do?
4. Still wearing the oven mitts, take the pie pan off towards you so that it makes a shield between you and the steam. Never lift the pan off away from you, or the escaping steam may burn you!
5. Turn the pan over again and gently hammer another hole into the bottom of the pan, about an inch away from the first hole.
6. Place the pan on the pot again. What do you see happening to the steam?
7. Continue this cycle about 4 or 5 times, adding one more nail hole with each new cycle. What do you notice happening to the steam with each new hole in the pan?
What Happened:
In this experiment, you were demonstrating how fumaroles work. A fumarole is a vent (hole) that lets out steam from within the Earth. The holes in the tin pan are simulating how steam escapes the Earth. When there is just one hole or fumarole, steam only has one exit, causing it to exit quickly and forcefully. Sometimes, the amount of steam coming out of one fumarole becomes too much for it, and the steam will follow cracks in the Earth to a new place to vent out of the surface. This formation of a new fumarole causes the pressure of the steam to ease up a bit, and the escaping steam comes out less quickly and less forcefully from both fumaroles. The more fumaroles present, the less pressure the steam is under. Later on in the life of these fumaroles, the steam escaping may decrease due to not enough water and/or a decrease in the heat from the underground magma chamber, causing smaller steaming vents.
Geothermal Science Lesson
What Causes Geothermal Areas?
In places such as Yellowstone National Park, New Zealand, and Iceland, the land is covered in spewing geysers, colorful hot springs, and bubbling mud pots. Even in winter, these areas are very steamy. These parts of the Earth are known as geothermal areas and form when an abundant source of water meets an intense source of heat. Since the Earth is covered in about 70% water, it’s the heat source that is crucial.
Beneath the Earth’s crust is a layer of magma (hot liquid rock). Geothermal areas exist where this magma is closer to the surface of the Earth than in other areas, causing these regions to have significantly higher surface temperatures. For instance, the average thickness of the Earth’s crust is about 12 to 50 miles thick, but in Yellowstone National Park, the magma chamber (magma housed by a layer of rock) is only 3 miles below the surface. Volcanoes are one of the main ways that magma gets pushed up so close to the surface. For this reason, geothermal areas often exist close to where volcanoes exist, though sometimes there is no apparent evidence of a volcano nearby. In these cases, it may be an isolated hotspot in the crust of the Earth where a new volcano may someday appear, or it is the remnants of an extinct volcano.
Features of Geothermal Areas
Hot springs, geysers, fumaroles, and mud pots are all geothermal features. They arise when cold groundwater seeps down and is heated by the rocks touching the underlying magma chamber. The hot water then rises to the surface in the form of a geothermal feature.
Hot springs occur when this heated water forms a pool on the surface of the Earth. Since that’s all it takes to form a hot spring, it the most common geothermal feature and can be found in places all over the Earth. Hot springs vary in temperature and can be calm, effervescent, or boiling depending on how hot the magma chamber below it is. When the hot water travels up, it dissolves material from the surrounding bedrock and brings this material up to the surface with it. For this reason, hot springs tend to be full of minerals, and people have used these hot pools for medicinal purposes for centuries. However, not all hot springs are safe to bathe in. Some are way too hot and/or way too acidic and can severely injure anyone stepping foot in them.
A geyser is a type of hot spring that periodically erupts, shooting columns of water and steam into the air. Like hot springs, geysers need an abundant supply of water and an intense heat source to exist. However, one more key ingredient is needed to keep them from being just a hot spring – the right plumbing. Unlike hot springs where the heated water has a simple path to travel upwards to reach the surface, geysers have a complex network of underground tunnels and reservoirs that trap the water and delay its arrival to the surface. While the water is trapped in the ground – sometimes as low as 10,000 feet – it gets heated far above the normal boiling point. However, due to the immense pressure that far down in the ground, the water cannot boil. The super heated water rises to the surface. As it rises, the pressure becomes less and less, and the water starts to boil and steam starts to escape. This release of steam allows some of the water to overflow out of the geyser’s mouth. This alleviates the pressure on the water below, causing a chain reaction. As the water at the top of the plumbing system starts to boil, it expands and is shot out of the geyser. This removes the pressure on the water below it, which suddenly boils and expands, causing the lower water to also be ejected out of the mouth of the geyser. This keeps happening to all the water within the chambers until there is no longer enough water left to continue the eruption. Groundwater then starts seeping back into this underground network, starting the cycle all over again.
Fumaroles are basically steam vents that allow water vapor and gases to escape the surface of the Earth. They can be found at the base of volcanoes or in geothermal fields, both on land and on the floor of the ocean. They are hotter than hot springs and geysers because any groundwater that enters a fumarole is instantly turned into steam – no liquid water is present in fumaroles. For this reason, they are sometimes called “dry geysers.”
One more unique feature found in these areas are mud pots. Mud pots are basically very acidic hot springs that dissolve the nearby rock. This rock turns into fine particles of clay and silica that becomes suspended in the water. Due to their sometimes close proximity to volcanoes, volcanic ash often gets mixed in the sediment in a mud pot. The hot water and steam rises from below, forming bubbles that burst when they reach the top. The bursting bubbles fling water and sediment to the edges and the ejected sediment builds a mound around the mud pot, making the opening look like a crater. A delicate balance of water and sediment is needed in order to keep a mud pot a mud pot. Too much water, and it becomes a hot spring. Too little water, and it becomes dry, cracked earth. Most mud pots go through cycles of overly wet to overly dry to just the right amount of water, depending on the season and the water table of the area.
Colors
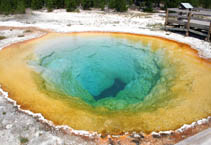
Many of these geothermal features are very colorful. These colors are due to the substances found in the water, and the color is a very good indicator of what these substances are. If a spring has a red color to it, most likely it is caused by a large amount of iron. If it is yellow, it is probably due to the presence of sulfur (though the smell of rotten eggs pretty much guarantees it is sulfur). Pinks and whites are often caused by the presence of calcium.
Amazingly, not all of the colors are caused by minerals. Due to the extreme heat and high acidity of many hot springs, for a long time it was believed that life forms could not exist in them. Then it was discovered that microorganisms known as thermophiles (literally “heat loving”) can live and actually thrive in this very hot water. If the water is blue or green in color, that gives a very good indication that microorganisms, such as algae, protozoa, and bacteria, make their home here.
Flashback in History: The Pink and White Terraces
The beauty of geothermal areas often overshadows the ever present danger related with them. Seeing abundant wildlife and vegetation seeming to live harmoniously with bubbling hot springs and spewing geysers leads many to believe that these areas are unique but tame places. However, in many of these areas, there is a dormant giant that awakes with very little notice. One such place is on the North Island of New Zealand near a town called Rotorua.
During the mid to late 1800’s, this geothermal area was a popular tourist destination for many European travelers. Like Yellowstone National Park, the area is full of hot springs, geysers, mud pots, and fumaroles. But its main attraction was the famous Pink and White Terraces, known for their awesome beauty and use as warm mineral baths. They were formed by hot springs and geysers at the top of two hills. The hot water full of dissolved calcium bicarbonate would flow down the hills, leaving behind calcium carbonate precipitate that formed into limestone and travertine terraces, which were filled with water. The calcium carbonate and other minerals in the water colored the terraces so that they were named appropriately enough the White Terraces and the Pink Terraces.
However, in the early morning hours of June 10, 1886, the volcano Mount Tarawera erupted and spewed hot mud, huge boulders, and thick ash over an estimated area of 5,800 square miles. The eruption lasted for about four hours and was so violent that it completely destroyed the Pink and White Terraces. Two Maori villages (natives of New Zealand) that thrived on the tourism created by the terraces were also completely wiped out, being buried in the huge mudslide created by the erupting mountain. All that remains of the Pink and White Terraces are black and white photos.