You have a microscope—now what?
With these directions, you can get started right away making your own microscope slides!
Make your own prepared slide with mounts of your choice of specimen on glass microscope slides. This is a great microscope activity for junior high to high school age.
Or make simple slides out of household items, a project that works well for elementary age kids and can be used with both compound and stereo microscopes.


In This Project:
How to Make a Slide for a Microscope: Making Your Own Prepared Slides
- Cork Cells
- How to Make a Smear of Cheek Cells
- Looking at Root and Stem Sections
- Leaf Cells
How to Make Simple Microscope Slides
- Making Simple Slides
- How to Use the Microscope
- Other Simple Microscope Slide Ideas
Microscope Worksheet: Recording Your Microscope Observations
How to Make a Prepared Slide for a Microscope
Learn how to make temporary mounts of specimens and view them with your microscope. Below are a few ideas for studying different types of cells found in items that you probably already have around your house. (Adult supervision required for cutting specimens.)
Cork Cells
In the late 1600s, a scientist named Robert Hooke looked through his microscope at a thin slice of cork. He noticed that the dead wood was made up of many tiny compartments, and upon further observation, Hooke named these empty compartments cells.
It was later known that the cells in cork are only empty because the living matter that once occupied them has died and left behind tiny pockets of air. You can take a closer look at the cells, also called lenticels, of a piece of cork by following these instructions.
Materials Needed:
- a small cork
- plain glass microscope slide
- slide cover slip
- sharp knife or razor blade
- water
How to make the microscope slide:
Carefully cut a very thin slice of cork using a razor blade or sharp knife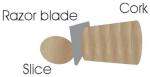 (the thinner the slice, the easier it will be to view with your microscope).
To make a wet mount of the cork, put one drop of water in the center of a plain glass slide – the water droplet should be larger than the slice of cork. Gently set the slice of cork on top of the drop of water (tweezers might be helpful for this). If you are not able to cut a thin enough slice of the whole diameter of the cork, a smaller section will work.
Take one coverslip and hold it at an angle to the slide so that one edge of it touches the water droplet on the surface of the slide.
Then, being careful not to move the cork around, lower the coverslip without trapping any air bubbles beneath it.
The water should form a seal around the cork. Use the corner of a paper towel to blot up any excess water at the edges of the coverslip.
To keep the slide from drying out, you can make a seal of petroleum jelly around the coverslip with a toothpick.
Begin with the lowest-power objective to view your slide. Then switch to a higher power objective to see more detail. Use this same wet mount method for the other cell specimens listed below.
How to Make a Smear of Cheek Cells
You can even check out cells from your own body! The cells on the inside of your cheek are called Squamous Epithelium cells and can be easily viewed with a compound microscope.
Materials Needed:
- toothpick (flat ones work best)
- plain glass microscope slide
- slide coverslip
- methylene blue
How to make the microscope slide:
To make a cheek smear, take a clean toothpick and gently scrape the inside of your cheek. Then wipe that part of the toothpick in the center of your slide.
Hold the coverslip with one end flush on the slide and gently wipe the edge of the coverslip along the middle of the slide’s surface.
This will smear the cells along the slide, making a layer thin enough to view clearly. Let the smear air dry.
Once your smear is dry, add a drop of methylene blue stain to the center of the smear so you will be able to see the cells more clearly.
Gently set a coverslip over the smear and scan your slide under low power to locate the cells, then observe them more closely under high power.
Looking at Root and Stem Sections
Vegetables are a great way to learn about plants. Did you know that carrots are actually roots, and celery stalks are stems?
Materials Needed:
- celery stalk (stem)
- a carrot (root)
- plain glass microscope slides
- slide cover slips
- water
How to make the microscope slide:
Cut a few extremely thin slices out of the middle of the carrot, and some from the middle of the celery stalk. Make a wet mount of the best slice from each vegetable and view them one at a time using your microscope’s 4x objective.
Compare and contrast what you see in each one, then switch to the 10x objective to look a little more closely.
To see details of the amazing structure of plants, use the 40x objective and scan each slide, carefully observing all of the parts and different cells.
Leaf Cells
Learn even more about plants by studying different sections of real leaves.
Materials Needed:
- a fresh leaf specimen (use one without many holes or blemishes)
- plain glass microscope slide
- slide cover slip
- sharp knife or razor blade
- water
How to make the microscope slide:
Before you begin, make sure the leaf is clean and dry. Lay it out flat on 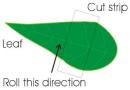 your working surface and slice about a 1” section crosswise out of the center using a sharp knife.
Then, starting at one of the short ends (the edges that you did not cut), tightly roll the leaf section.
Carefully make several very thin slices off one end of the roll with a razor blade or knife. The slices should look almost transparent. T
he cells surrounding the central vein of the leaf are what you will want to look at; depending on the size of the leaf, you might have to cut the slice again so that the central part is the part you will actually see on your slide.
Make a wet mount on a plain slide with the inner part of the leaf section facing up (so the inner cells are visible). Look at the slide with the 10x objective to see the general structure, and higher power to see details of cells.
A tool called a microtome is extremely helpful for preparing specimens for slide mounting. A microtome allows you to expose a small amount of the specimen at a time and cut it off against a solid edge using a very sharp razor blade type knife.
Check out our Slide Making Kit if you’re interested in materials and instructions for making more slides.
We have a variety of microscope prepared slides available both individually and in sets, such as our Biology Slide Set.
How to Make Simple Microscope Slides
Learn more about using your compound microscope by making simple slides using common items from around the house! (Note: This article was written for use with a compound microscope; however, the technique can be easily adapted for use with a stereo or dissecting microscope as well.)
Materials Needed:
- clear Scotch tape
- a few granules of salt, sugar, ground coffee, sand, or any other grainy material
- compound microscope like the Home Microscope
Making Simple Slides
To make a slide, tear a 2 ½-3” long piece of Scotch tape and set it sticky side up on the kitchen table or other work area.
Fold over about ½” of the tape on each end to form finger holds on the sides of the slide.
Next, sprinkle a few grains of salt or sugar in the middle of the sticky part of the slide. You can repeat this with the other substances if you like, just be sure to label each slide you make with an 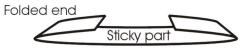 ink pen or permanent marker so you will know what’s on the slides!
(Note: Because there are several suggestions for things that can be done with these homemade slides throughout this article, you might want to make several slides at once so that you have them ready.)
How to Use the Microscope
Place one of your homemade slides on the center of the microscope’s stage, directly over the clear hole. Put one stage clip on one edge of the slide to hold it in place leaving the other end free to move around. Turn your microscope’s light source on, lower the stage, and position the lowest power objective lens over the slide.
Looking through the eyepiece, turn the coarse focus knob until the outlines of the granules become visible. Then turn the fine focus knob to get the image as sharp and clear as possible. Because the tape is thinner than glass microscope slides, you may have to move the slide around some to focus it better – try slightly lifting it up or pressing it down with your fingers. The basic shape of the crystals should be visible at 40x. Now turn the nosepiece so the 10x objective (100x magnification) is positioned over the stage.
Most compound microscopes are parcentered and parfocal. Parcentered means that if you centered your slide while using one objective, it should still be centered even when you switch to another objective. Parfocal means that once you have focused on an object using one objective, the microscope will still be coarsely focused when you switch to a different objective. Because of these features, you should only need to turn the fine focus knob slightly and perhaps move your slide a tiny bit to make sure it is centered and well focused under the new objective lens.
As you slowly turn the fine focus knob you are actually moving in and out of many layers of the specimen, which is why some parts in the field of view may look blurry while some are sharp. This is simply because you are looking at a three-dimensional object and at high magnification the different layers seem much larger than they would without the magnification, even in tiny single-celled organisms!
Compare the shapes, sizes, and colors of the crystals on each of the slides you made. Record your observations on a sheet of paper or in your science notebook. Include information about the slide such as the date, what it is, the magnification level used, and perhaps even a drawing. You can also print out copies of our Microscope Observation Sheets to put in your science notebook.
Other Simple Microscope Slide Ideas
Hair and thread also work well on homemade tape slides. Collect samples of hair from family members or pets and stick one hair from each sample on a tape slide. Label each slide and view them one at a time with your microscope experimenting with different magnification. Write down your observations about each to see how hairs from humans and animals differ. You can also look at threads or fibers from furniture, rugs or clothing from around your house.
Small insects such as gnats, ants, or fruit flies are interesting to observe with a microscope as well. Stick a dead insect to a tape slide and set it on your microscope stage. Begin with the lowest power and examine all of the insect’s parts. If you discover something interesting, perhaps an eye or part of a leg, look at it more closely with a higher power objective.
To learn more about how the optics of a microscope work, try this experiment: look through a section of a newspaper and find a word that has the letter “e.” Cut out the word and stick it to one of your tape slides with the letters facing up. Observe it under the 4x objective and write down what you see. What does the “e” look like? Is it facing the direction you expected that it would be? Now look at it again with the 10x objective. What can you tell about the lenses of your microscope from this activity? What can you tell about printed material from this experiment?
Additional Resources
For instructions and materials to make more advanced microscope slides, check out our Microscope Slide Making Kit.
Other articles you might be interested in:
Microscope Worksheet: How to Record Microscope Observations
In the field of science, recording observations while performing an experiment is one of the most useful tools available.
Early scientists often kept very detailed journals of the experiments they performed, making entries for each individual experiment and writing down virtually everything they saw.
These entries often included drawings and detailed descriptions as well as the procedures they used, the data they collected, and conclusions drawn from their experimentation.
Our printable Microscope Observation worksheets will help you keep track of the things that you study with your microscope and remember what you have learned.
Blanks are provided for recording general information about each slide, such as the date it was prepared and the stains used, as well as space to write down your observations and circles to do sketches of what you see.
Click here to print out copies of the Microscope Observation worksheet!

More About Microscopes:
- Looking for a microscope? We offer a wide selection that can fit your science goals and budget.