The first thing to know is that the quail eggs stay dormant until the incubation process starts. Therefore, it is safe to ship the eggs to you even in below freezing weather. Warmth will not be a issue until you actually start incubating the eggs. Do plan to use them right away, though, because the likelihood of hatching decreases if too much time passes after they are laid.
Before you start incubating, read the entire instruction manual that comes with your incubator.
Location:
During incubation, keep in mind that eggs are very delicate. They can be ruined by small mistakes such as turning them wrong end up or shaking them. For this reason, the location of your incubator is important. Do not place the incubator
- Near a gas heater: The carbon dioxide from the gas will kill the embryos.
- In a draft: the embryos can develop pneumonia easily, so keep them out of wind.
- Near a heater or in a cold room: too much heat or cold will kill an embryo.
- Where it could be easily bumped or upset by pets or small children.
The incubator is made of sturdy but lightweight plastic, so you may want to stabilize it to make sure it can’t be tipped over when the eggs are inside. Customers have had success simply using books to help secure the incubator, and others have gone so far as to bolt the incubator to a board. You can use electrical tape to secure the cord to the table or board so it doesn’t hang free and get caught.
Setting up the Incubator:
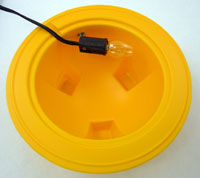
1. Screw the bulb into the socket and plug the cord in to make sure the light works. It’s a good idea to have an extra 7-watt bulb on hand just in case you have problems with the bulb during incubation.
2. Locate the hole in the bowl near the grooved part of the rim. Position the metal tab on the light socket over the hole, with the bulb facing away from the groove in the rim. Insert the screw from the outside of the bowl and use a screwdriver to screw it through the metal tab until the bulb is securely attached. The cord should rest in the groove as it exits the bowl.

3. Cut the square piece of aluminum foil in half so you have two 3×6″ pieces. Place one half in the bottom of the bowl. Allow one end to come up the side so it is behind the bulb. The top edge of the foil should line up with the middle of the bulb.
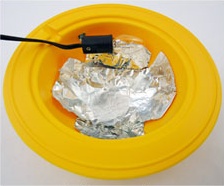
4. If you have trouble getting the temperature high enough with just the one piece foil, insert the second piece in the bottom of the bowl perpendicular to the first one.
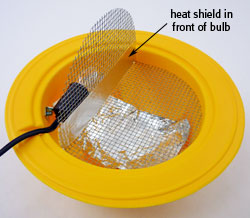
5. Carefully bend the wire rack open so that it forms a 90-degree angle. The strip of foil should be folded securely over the base of the vertical side. Set the rack in the bowl so that the foil-covered wire forms a heat shield between the bulb and the eggs.
6. Plug the cord in and place the thermometer on the wire rack about one inch from and parallel to the foil heat shield.
7. Put the dome on the base, lining up the notch over the groove in the rim of the bowl.
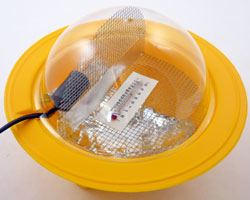
8. When the thermometer stops rising and levels off, this is the temperature inside the incubator. It should be 100 degrees, although anywhere between 98 and 102 is acceptable. If the temperature is slightly high, tilt the bulb upwards and slide the foil strip down towards the bottom of the base. If the temperature is slightly low, tilt the bulb down, slide the foil up higher, or put the extra piece of foil in the bottom, perpendicular to the first one. If necessary, you can also add aluminum foil over the dome to help raise the temperature. Using these techniques, you should be able to keep the temperature at 100 degrees in a 70-74 degree room.
9. Fill one of the hollow legs with water to provide the necessary humidity for the eggs. Make sure there is still water in there when it is time for the chicks to hatch. (You can add more through the wire with a dropper.)
10. Make sure the hole at the top of the dome is never covered – this provides necessary ventilation for the eggs.
Hatching Eggs:
1. Now you can place the eggs on the wire rack, in the center and close to the heat shield. Try to keep the large end tilted slightly up (a thin piece of foam from the packaging can help you with this). The little chick’s head is located in the large end of the egg, and if you stand it on its head it will not live.
2. The eggs must be turned end over end at least twice per day. Three times is even better, if you can – try a turning schedule of 8 a.m., 2 p.m. and 10 p.m. You can make markings on opposite sides of the egg with a pencil to help keep track of the turnings.
3. Stop turning the eggs three days before they are due to hatch. Coturnix quail eggs have an incubation period of 17-18 days, so don’t turn after day 14. The quail can hatch late, so don’t be too quick to give up if they don’t hatch on day 17 or 18.
4. After your quail have hatched, you can set up a brooder box. See our newly hatched chicks article to learn more.