Modern Inventions
Camera
In these days of disposable cameras, digital cameras, and camera phones, it is hard to imagine a time when people couldn’t record their memories in color with the push of a button. Before 1888, photography was expensive and the necessary equipment cumbersome. But then George Eastman developed roll film and patented the first portable, hand-held Kodak camera. The camera came pre-loaded with film, and after taking 100 exposures the owner sent the entire camera to the Eastman Kodak Company, where the film was removed and developed. Kodak loaded new film into the camera and sent the pictures and camera back to the owner. In other words, Eastman’s slogan ‘You Press the Button and We Do the Rest’ was very accurate!
A camera can be a very complex machine with focusing mechanisms, flashes, and other features, but at its most basic it needs just three main elements:
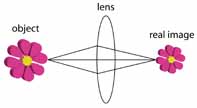
- Lens. Light is reflected off of an object in all different directions. A convex lens bends the light rays and focuses them so they converge in a single point. At that point, an upside-down, reversed ‘real image’ of the object is formed. (You can see how a lens focuses light by holding one over a piece of white paper in front of a window. The sunlight should appear on the paper as a small bright beam.) To take a picture, a camera lens has to focus the light reflecting off the scene in front of it into a small area on a light-sensitive surface.
- Light-sensitive material. In a camera, the lens focuses the light into a point on film. Film is treated with chemicals that undergo a chemical reaction when exposed to light, thus recording the image. Since it is light sensitive, the film has to be developed in a dark room. Developing involves several steps and different kinds of chemicals before you get a picture ready for your scrapbook.
- Shutter. Since film is highly sensitive to light, it will be ruined if it is exposed to light too long. The shutter is the part of the camera between the lens and the film – it controls when and how long light can reach the film. When you take a picture, the shutter opens allowing light to hit the film, then closes almost immediately. How long the shutter stays open (exposure time) depends on how sensitive your film is and how much light there is. On bright sunny days, the shutter will need to stay open for much less time than at night.
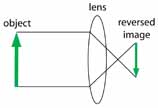
You may be wondering why the real image is upside-down and reversed. This is because light bouncing off the bottom of an object has to be bent upward by the lens, and light from the top has to be bent downward. They will cross, so when they make the image, it will be upside down. The same thing happens side to side, which is why the image is also reversed.
The earliest type of camera was called a camera obscura, which is Latin for ‘dark room.’ It consisted of a dark room with a tiny hole for light to come through. The hole acted like a lens, because it only allowed light to enter as a single narrow beam; this beam produced a reversed image of outside objects on the wall opposite the hole. Since Aristotle mentions this type of camera in his writings, we know it was used to view the sun as early as 300 B.C.! Eventually the camera obscura was made out of a large box and had lenses to flip the image right side up. Historians believe that artists such as Johannes Vermeer used these to view an image of the scene they wished to paint.
The camera obscura accomplished only half of what a modern camera does – it focused light reflecting off of objects into a single narrow beam that produced a real image of the objects. But this only produced the image; it didn’t record it. It wasn’t until the early 19th century that scientists developed light-sensitive plates that could receive the image. And the early methods weren’t very efficient – photographic images were the result of 8 hours or more of exposure to light. Eventually a Frenchman named Daguerre invented the Daguerreotype – a process of photographing on metal plates. The exposure time was considerably shorter – about 10 to 20 minutes – but still long enough to explain why people didn’t try to smile in those old photographs! Through the efforts of many different people, exposure time was reduced to a few seconds by the mid-1800s. When Eastman figured out how to roll the film so it could fit in a hand-held camera, photography became available to the masses, and cameras have been indispensable ever since!
Camera technology continues to advance. Today’s digital cameras do away with film altogether. The light is focused onto a semiconductor that records it electronically, instead of chemically like film does. Then the electronic impulses are converted into the 1s and 0s of computer language, producing an image made up of tiny colored dots, or pixels. These images can be easily changed, resized, e-mailed, or uploaded on websites.
Want to make your own camera obscura? It’s also called a pinhole camera, and you can make one with this science project.
Vacuum Cleaner
Imagine wanting to vacuum your carpets in the early years of the 20th century. You would have to call a door-to-door vacuuming service, which would send a huge horse-drawn machine to your house. Hoses would be fed through your windows, attached to the gasoline-powered vacuum outside in the street. Not very convenient, right? And when the first portable electric vacuum was invented in 1905, it weighed 92 pounds…also not very convenient!
Vacuums have undergone many modifications over the years, going from simple carpet sweepers to high-powered electric suction machines. The vacuum cleaner as we know it was invented by James Murray Spangler in 1907. He used an old fan motor to create suction and a pillowcase on a broom handle for the filter. He patented his ‘suction sweeper,’ but soon after that, William H. Hoover bought his patent and started the Hoover Company to manufacture the vacuum cleaners. Hoover’s ten-day free trial and door-to-door sales soon placed vacuum cleaners in homes all over the country. Over the years Hoover added components (such as the ‘beater bar’) to dislodge dirt in the carpet so the vacuum could suck it up.
Vacuum cleaners work because of Bernoulli’s Principle, which states that as the speed of air increases, the pressure decreases. Air will always flow from a high-pressure area to a low-pressure area, to try to balance out the pressure. A vacuum cleaner has an intake port where air enters and an exhaust port where air exits. A fan inside the vacuum forces air toward the exhaust port at a high speed, which lowers the pressure of the air inside, according to Bernoulli’s Principle. This creates suction – the higher pressure air from outside the vacuum rushes in through the intake port to replace the lower-pressure air. The incoming air carries with it dirt and dust from your carpet. This dirt is trapped in the filter bag, but the air passes right through the bag and out the exhaust. When the bag is full of dirt, the air slows down, increasing in pressure. This lowers the suction power of your vacuum, which is why it won’t work as well when the bag is full.
Make a Vacuum Cleaner
A vacuum cleaner is able to suck dirt off carpet because high pressure air from outside it flows toward low pressure air inside. In an electric vacuum, a fan causes air inside the vacuum to move quickly, which lowers the air pressure, causing suction. The higher-pressure air from outside the vacuum is sucked in to replace the low-pressure air, bringing dirt and dust with it to be caught in the filter bag.
In this project you can make a hand-pump vacuum cleaner that alters the air pressure inside it and creates suction using a piston instead of a fan. Follow the procedure to make your vacuum, then read the explanation of how it works! An adult will need to help with the cutting.
What You Need:
- 2-liter plastic soda bottle
- Ping-pong ball
- Razor blade, box cutter, or sharp scissors
- Tape
- Thread
- Paper
- Tissue paper
What You Do:
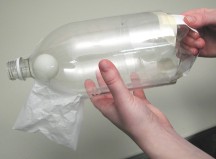
1. Cut the bottom of the soda bottle off about 1/3 of the way up from the base. Now cut a slit down one side of the bottom third of the bottle – this will allow you to slide it inside the top part of the bottle so it can act as a piston.
2. Cut a 6’x3′ strip of paper and fold it in half lengthwise for extra strength. Tape each end of this strip to the bottom of the bottle to make a handle for your piston.
3. In the top part of the bottle, cut a 3/4-inch hole about 1-1/2 inches below the neck. This hole will lead to the filter bag.
4. Make a filter bag for your vacuum with a 6’x4′ piece of tissue paper. Fold the paper rectangle in half and tape the sides to make a bag. Tape this over the hole you made near the neck of the bottle.
5. Tape one end of the thread to the ping-pong ball. Put the ball in the top part of the bottle. Feed the free end of the thread through the mouth of the bottle, and tape it to the outside of the bottle so the ping-pong ball hangs just slightly below the neck.
How does this contraption you just made work? Push the bottom part of the bottle into the top part, then pull it back sharply. This decreases the air pressure inside the bottle, because now there is a bigger space for the same amount of air. The lower-pressure air inside the bottle creates suction, pulling in higher-pressure air from outside in through the mouth. Now push the piston back in; this compresses the air and increases the pressure, so air flows back out of the bottle. The ping-pong ball works as a valve – when you push the piston in, it forces the ball into the neck of the bottle so that the air exits through the hole with the filter bag, rather than going out through the mouth.
Now put your vacuum to work! Try sucking up bread crumbs or tiny balls of paper. When you pull the piston out, they will be sucked into the bottle, and when you push the piston in, they will be forced into the filter bag.
Experiment to find out the best way to use your bottle vacuum. Does it work better to pump the piston rapidly? Should you pull out on the piston faster than you push in on it? Can you think of ideas to improve the design and efficiency of your vacuum? Give them a try!
The Invention of the Microwave Oven
Sometimes people invent things because they are trying to – they have an idea, and they experiment with ways of carrying it out. Other times inventions happen without anyone planning for them; this is how the microwave oven was invented.
During World War II a number of scientists worked on improving radar systems for airplanes. These systems needed magnetrons – vacuum tubes that generate high-frequency radio waves – and they needed a lot of them. But because of their complexity, they could only be manufactured at a rate of less than 20 per day. Then Percy Spencer, an employee at the Raytheon Company, worked out a way to simplify the magnetron and increase production. Thanks to his innovations, production jumped to 2,600 magnetrons per day, greatly aiding the war effort.
Shortly after the war ended, Spencer accidentally discovered another use for magnetrons. He was continuing radar research at a Raytheon lab, and as he stood in front of a magnetron he realized the candy bar in his pocket was melting. His curiosity came alive and he quickly tested the magnetron’s effect on un-popped popcorn. When the kernels exploded, he knew he was really on to something!
The magnetrons emitted energy in the form of high-frequency radio waves, called microwaves. (Learn about radio waves and electromagnetic radiation in our article on energy.) At this frequency, microwaves pass through glass, ceramic, and plastic, but are absorbed by water, fats, and sugars. This absorption of energy ‘excites’ the atoms and the food heats up.
Spencer and Raytheon began developing the microwave oven, and in 1947 they produced the first commercial version. It cost $5,000, weighed 750 lbs, and was 5’6′ tall. Not only that, but it used a water-coolant system that required extra plumbing to be installed wherever the microwave was used. As you can imagine, it was not an instant success.
Success may not have been instant, but in this case it was inevitable. Continuing development and technological advances eventually produced the small, efficient microwaves we have today in almost every home in America. And it all started with a sticky, gooey accident!
Find Out More!
Read about Alexander Graham Bell, Thomas Edison, and the Wright brothers, plus make your own light bulb! Find all this in our first Modern Inventions Science Lesson.